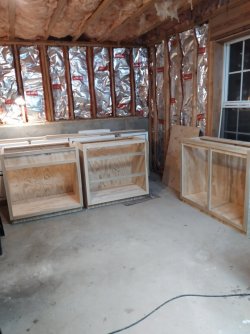
Twelve Kitchen Cabinets

Very nice, looks great. Obviously make sure you stand the units up before trying to align them. It's a stupid comment from me, but something I would probably do once.
I hear you there! Making mistakes is a good way to figure things out sometimes.
 
You can bend it if you can get moisture in there, but painted will make it tough. It will annoy you to know end the rest of your life though, so just make a new door :beer2:
Herein lies the problem with doing things yourself.
You will always see the imperfections. Always. Every. Single. Time. you walk by it.
 
Herein lies the problem with doing things yourself.
You will always see the imperfections. Always. Every. Single. Time. you walk by it.
Yup, drives my wife crazy. I'll put down flooring or something and I'll notice the one board or tile that I miscut and so the grout or joint is 1/8" wider than everywhere else and it will gnaw at me. She is correct in that no one else notices it, but I know it is there.
 
Yup, drives my wife crazy. I'll put down flooring or something and I'll notice the one board or tile that I miscut and so the grout or joint is 1/8" wider than everywhere else and it will gnaw at me. She is correct in that no one else notices it, but I know it is there.
I had a partner who used to fuss over those kinds of mistakes.

I used to say to him, "Nobody will know about that except you and God, and God doesn't care."
 
Hey Play Nation! Please pardon my long absence, I haven't been very busy at all, not at all! My first twelve cabinets are mostly completed and I'm just about ready for the next chapter in this kitchen renovation which will be the removal of the existing cabinets and the dismantling and removal of the kitchen peninsula and about a 6' section of wall. I'm hoping to get that started in 3 to 5 weeks.

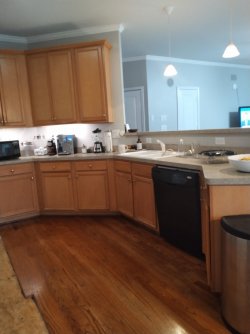
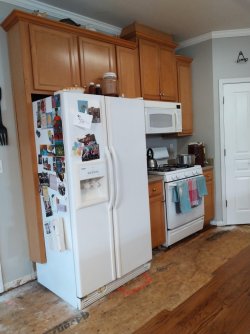
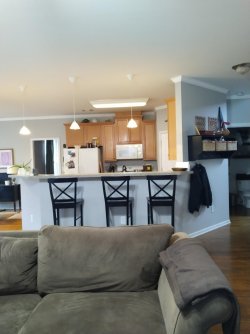
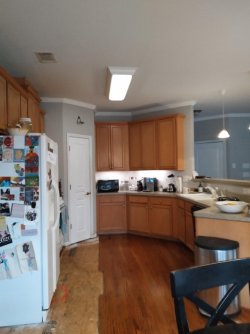
In the meantime I need to build three more base cabinets for the new island. I have the island penciled in at 8' 6" long and 42" wide. I spent a couple grand getting started back in October and since then I have been able to save a nice chunk of change to pay for things as I go. Which is a great feeling and I almost certainly won't need to use any credit until the very end when we buy new appliances. Anyway, the shit's about to get real! These pictures are of the existing kitchen as it is now. I will post new pics at the removal stage.

kitchen 1.jpgkitchen 2.jpgkitchen 3.jpgkitchen 4.jpg
 
Hey Play Nation! Please pardon my long absence, I haven't been very busy at all, not at all! My first twelve cabinets are mostly completed and I'm just about ready for the next chapter in this kitchen renovation which will be the removal of the existing cabinets and the dismantling and removal of the kitchen peninsula and about a 6' section of wall. I'm hoping to get that started in 3 to 5 weeks.

In the meantime I need to build three more base cabinets for the new island. I have the island penciled in at 8' 6" long and 42" wide. I spent a couple grand getting started back in October and since then I have been able to save a nice chunk of change to pay for things as I go. Which is a great feeling and I almost certainly won't need to use any credit until the very end when we buy new appliances. Anyway, the shit's about to get real! These pictures are of the existing kitchen as it is now. I will post new pics at the removal stage.

View attachment 20770View attachment 20771View attachment 20772View attachment 20773

That looks great... My work bonus come in March & I am looking forward to getting my basement kitchenette together.

As far as imperfections go.... I've never seen a perfect house. There is no such thing.
 
Hey Play Nation! Please pardon my long absence, I haven't been very busy at all, not at all! My first twelve cabinets are mostly completed and I'm just about ready for the next chapter in this kitchen renovation which will be the removal of the existing cabinets and the dismantling and removal of the kitchen peninsula and about a 6' section of wall. I'm hoping to get that started in 3 to 5 weeks.

In the meantime I need to build three more base cabinets for the new island. I have the island penciled in at 8' 6" long and 42" wide. I spent a couple grand getting started back in October and since then I have been able to save a nice chunk of change to pay for things as I go. Which is a great feeling and I almost certainly won't need to use any credit until the very end when we buy new appliances. Anyway, the shit's about to get real! These pictures are of the existing kitchen as it is now. I will post new pics at the removal stage.

View attachment 20770View attachment 20771View attachment 20772View attachment 20773
Had a leak behind the fridge huh?
 
Mine is," Looks good from a galloping horse"
Ba ha ha. I’m adding this one to my list. Like just about every other DIY’er I forever see the imperfections in my work. Like Ford I use the “good enough for govt work” line learned from my dad.

Which generally leads to the wife saying “you work in the private sector” and me saying “shut up already”.

@Parka! ....really ambitious and nice work showing so far. I’ve often thought of doing this in my kitchen, but the skill set I have is still growing and far adequate. How did you measure out the existing cabinets for sizing without removal?

Im about to build out a large cabinet to inset in my workbench and build out drawers and sliding trays for all the shit I’ve accumulated. It’s basically one big box going into an almost perfect square of the workbench and I just know I’m going to learn some lessons on this one. Good thing is it doesn’t need to be at a level of fit and finish you’re doing there. Just needs to have the utility I need.

Good luck getting the rest in :thumb:
 
That looks great... My work bonus come in March & I am looking forward to getting my basement kitchenette together.

As far as imperfections go.... I've never seen a perfect house. There is no such thing.
Hey thanks @BadMotoWeazal ! And good luck with your project. As far as not being perfect, I'm glad I'm not a perfectionist! I have that one cabinet door that's about 1/4" warped out at the top of a wall cabinet. That is just too much and when I start making the rest of the doors for the next three base cabinets, that's when I will make the replacement door. If it was a 1/16th" warped out I could live with that and act like I never noticed it.
 
Ba ha ha. I’m adding this one to my list. Like just about every other DIY’er I forever see the imperfections in my work. Like Ford I use the “good enough for govt work” line learned from my dad.

Which generally leads to the wife saying “you work in the private sector” and me saying “shut up already”.

@Parka! ....really ambitious and nice work showing so far. I’ve often thought of doing this in my kitchen, but the skill set I have is still growing and far adequate. How did you measure out the existing cabinets for sizing without removal?

Im about to build out a large cabinet to inset in my workbench and build out drawers and sliding trays for all the shit I’ve accumulated. It’s basically one big box going into an almost perfect square of the workbench and I just know I’m going to learn some lessons on this one. Good thing is it doesn’t need to be at a level of fit and finish you’re doing there. Just needs to have the utility I need.

Good luck getting the rest in :thumb:
Thank you @Orlando_Eagles ! Let me stress that I am FAR from a master craftsman. This is my first time at building cabinets and before I got started I had doubts and was second guessing myself thinking I'm getting in over my head but so far I am mostly nailing it! For a while I thought I should just go to Home Depot and buy a bunch of budget cabinets, I sure am glad I didn't do that. Jeez, a dozen cheepo store cabinets are still quite costly.

You have the right mindset that it's just a 'box', keep it simple and straightforward, breaking it down to one step at a time. Take lots of measurements and draw lots of diagrams before you make your first cut. And I highly recommend finding some tutorials on youtube of working with plywood, how to make a box, building cabinets, etc. I used a tutorial and it was incredibly helpful. Working with 3/4" plywood is pretty slick, I used to have the mindset that to build, you need to make a frame first and then cover for a finish. With 3/4" plywood it is both the bones and the skin of the piece you're building.
 
How did you measure out the existing cabinets for sizing without removal?

Im about to build out a large cabinet to inset in my workbench and build out drawers and sliding trays for all the shit I’ve accumulated. It’s basically one big box going into an almost perfect square of the workbench and I just know I’m going to learn some lessons on this one. Good thing is it doesn’t need to be at a level of fit and finish you’re doing there. Just needs to have the utility I need.

Good luck getting the rest in :thumb:
I just measured from the end of the wall to the doorway and figured it to end about three inches from the door trim. And I did the same thing on the other side of the door too. On one side, the longer side, I was able to use all standard widths too. Standard widths are at three inch increments, 18," 21, 24, ..... 33, 36, 39, 42". On the other side I had to make the middle cabinet at 29" so that the row ends at about three inches from the door trim. Also spacers between the cabinets can be used if you need to stretch things out a little bit.
 
Thank you @Orlando_Eagles ! Let me stress that I am FAR from a master craftsman. This is my first time at building cabinets and before I got started I had doubts and was second guessing myself thinking I'm getting in over my head but so far I am mostly nailing it! For a while I thought I should just go to Home Depot and buy a bunch of budget cabinets, I sure am glad I didn't do that. Jeez, a dozen cheepo store cabinets are still quite costly.

You have the right mindset that it's just a 'box', keep it simple and straightforward, breaking it down to one step at a time. Take lots of measurements and draw lots of diagrams before you make your first cut. And I highly recommend finding some tutorials on youtube of working with plywood, how to make a box, building cabinets, etc. I used a tutorial and it was incredibly helpful. Working with 3/4" plywood is pretty slick, I used to have the mindset that to build, you need to make a frame first and then cover for a finish. With 3/4" plywood it is both the bones and the skin of the piece you're building.
Someone mentioned to me that if you just need a few knock around cabinets in the workshop just buy some cheap ones made. But, I’m renting and don’t want to hang cabinets on the walls. And the dimensions on the workbench are very odd.

So I’ve done a lot of thinking and drawing out plans on this. A few months brainstorming and watching videos as well. Now it’s time to shit or get off the pot. I know there will be learning lessons and I’ve learned to move slow when I’m doing something new. I’ve built a liquor cabinet last fall that came out well, so I know I can make it happen.

Biggest concern is when I took the carpenters square to the workbench and saw it’s not quite perfectly square.

Laughing at the “measure lots before you cut”. My grandfather was a carpenters apprentice as a young man. His favorite line was “I measured it three times and it’s still too short” :dhd:
 
We sure did! I'm guessing you've seen it more than once in your line of work?
All the time. Are you going to do wood flooring in the kitchen again?
 
All the time. Are you going to do wood flooring in the kitchen again?
Yes. We're using our insurance to get it fixed. I need to get that filthy peninsula removed before we schedule the floor repair. My hag keeps tapping the brakes on removing the peninsula I think because she's not ready for the inconvenience of it all. I even bought a utility tub to use for a temporary sink, very convenient!
 
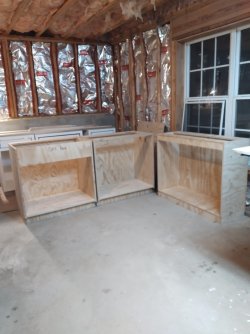
Good Morning Playnation! Just a friendly update on my project, it's now FIFTEEN kitchen cabinets and I only have two more to build. But one of them isn't really a cabinet, it's an enclosure for the range exhaust fan. And #17 will be a tall narrow cabinet beside the fridge and across the top of it and then just box it in with a panel down the other side. These three boxes here are for the island.

Thirteen 14 and 15.jpg

Things have going good, I just bought a nice big 32" black stainless steel single bowl sink, a Delta faucet and a glass front mini fridge. I was tempted to buy some off brand $80 faucet to save 140 bucks but I went with my gut and got a known quality Delta that will last 20 years or longer and I'm glad I did. I'm saving a boatload of cash anyway by building the cabinets and doing most of the work without hiring contractors. And I haven't had to use a single penny of my Hag's money plus I'm 2 grand in the black saving up for the next big cost which will include a contractor to fabricate stone countertops all around. I'm looking at 4 to five grand probably but I haven't got an estimate yet.

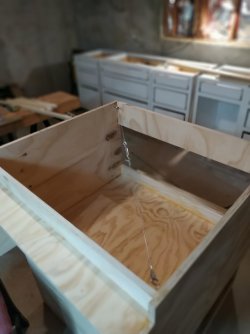
Some of you mentioned earlier that you didn't think you had the skills to build a cabinet but this next picture I think really shows how simple it is. If you can cut a perfect square or rectangle then you do have the skills needed. Another motivator to develop some new skills is getting a $35,000 estimate for a new kitchen. These base cabinets are costing me about 80 bucks each to build and that includes some pretty slick hardware.

easy as hair pie.jpg
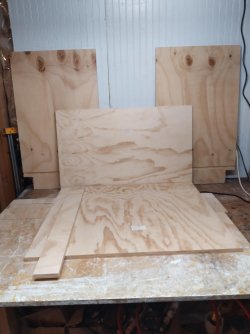
So look at that, It's just two side pieces, a back and a bottom and the three of those narrow pieces for top stretchers and a toe kick. And you don't even need to use dado joints to hold the bottom, cleats would work just fine. And these cabinets are rock solid.

And lastly it looks like I can start the demo work on March 11, my Hag/Mom is going out of town that weekend and my twin brother is gonna help me with the demo! He lives about 150 miles away in Columbus Ga.

Until next time, Peace and Love!
 
Today I made face frames for those three recent base cabinets. The face frame covers up the unfinished plywood edges and adds another element of strength and stability to an already sturdy box. It also makes the box start to resemble a cabinet.

So one of my boxes was out of square by a 1/2 inch so before I put the face frame on it I put a turnbuckle on it corner to corner and pulled it back to square and then when the face frame is attached I can remove the turnbuckle and the face frame will keep it square. If you look close you can see the turnbuckle.
out of square.jpg

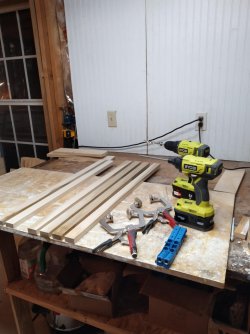
Here are the parts to a face frame. In this case it's two stiles (vertical sides) and four rails (top, bottom and drawer dividers, horizontal).faceframe parts.jpg

And this are those same pieces joined together.faceframe assembled.jpg

And finally fastened on the box.

faceframes attached.jpg

Tomorrow, well later today, I will make the the three drawers for one cabinet and the other two cabinets will just have doors only. Those first 12 cabinets I built were great practice and experience because I feel like a seasoned veteran building these three here. It's going so much smoother and my techniques have improved quite a bit.
 
Top