Install the app
How to install the app on iOS
Follow along with the video below to see how to install our site as a web app on your home screen.
Note: This feature may not be available in some browsers.
You are using an out of date browser. It may not display this or other websites correctly.
You should upgrade or use an alternative browser.
You should upgrade or use an alternative browser.
Twelve Kitchen Cabinets
- Thread starter Parka
- Start date
- Joined
- Dec 1, 2020
- Posts
- 2,528
- Reaction score
- 3,795
- Bookie:
- $ 3,000.00
- Location
- Gwinnett County, Ga.
It sure does! That's what I removed, that 3.5" standard baseboard. The first floor used to be carpeted but right after we moved in here we had it removed and that hardwood floor was installed. But they butted the new floor right up against the baseboards instead of removing the baseboards and doing the job right. So basically the baseboards were buried 3/4" deep making them that much shorter. That's not good enough for me and I dug all that old baseboard out and I want to do EXACTLY what you did at your mom's house.It looks way better than the standard base.
- Joined
- Dec 1, 2020
- Posts
- 2,528
- Reaction score
- 3,795
- Bookie:
- $ 3,000.00
- Location
- Gwinnett County, Ga.
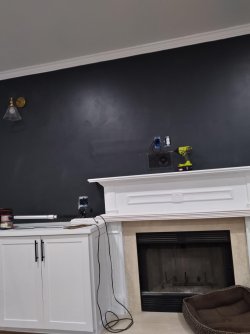
I solved the problem of making another material run but it cost some extra pocket money, money solves lot's of problems.
I got the shit delivered!
I got 240 feet of 6" baseboards, actual size 5 1/2" .... friggin weirdo measuring systems!
I also got me six more sheets of 3/4" cabinet grade plywood for my fish tank build.
The Guide Bear is back in business, hear me ROAR!
I got the shit delivered!
I got 240 feet of 6" baseboards, actual size 5 1/2" .... friggin weirdo measuring systems!
I also got me six more sheets of 3/4" cabinet grade plywood for my fish tank build.
The Guide Bear is back in business, hear me ROAR!

- Joined
- Aug 17, 2020
- Posts
- 20,602
- Reaction score
- 46,628
- Bookie:
- $ 83,441.00
Get that stone around the fireplace already!!!!!I solved the problem of making another material run but it cost some extra pocket money, money solves lot's of problems.
I got the shit delivered!
I got 240 feet of 6" baseboards, actual size 5 1/2" .... friggin weirdo measuring systems!
I also got me six more sheets of 3/4" cabinet grade plywood for my fish tank build.
The Guide Bear is back in business, hear me ROAR!
View attachment 41653
- Joined
- Dec 1, 2020
- Posts
- 2,528
- Reaction score
- 3,795
- Bookie:
- $ 3,000.00
- Location
- Gwinnett County, Ga.
It looks like a Wednesday start for that task! Maybe even later in the day tomorrow if I can wrap up this baseboard.Get that stone around the fireplace already!!!!!
Finish work takes me forever though, I have a punch list and it keeps shrinking so that's good.
A couple other minor problems, my Hag-Fiance' gets all goofy about sawdust and so I had to set my cut table outside on the deck. The bigger problem is that it has been raining damn near every single day so I have to dodge rain drops to get all this trim painted and cut.
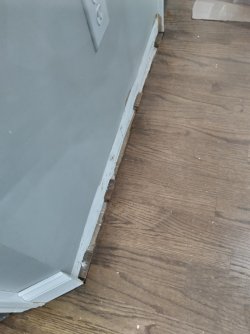
This picture shows how the old baseboards, although removed, it shows how they were 'buried' when the hardwood floor was installed.
So I put those little blocks in the gap so the new taller baseboards sit on top of the floor.
And Petey, thanks for all the slick tips and advice and encouragement!

- Joined
- Aug 17, 2020
- Posts
- 20,602
- Reaction score
- 46,628
- Bookie:
- $ 83,441.00
Scuff that existing stone up a bit, so you get a good bond with the new stuff!It looks like a Wednesday start for that task! Maybe even later in the day tomorrow if I can wrap up this baseboard.
Finish work takes me forever though, I have a punch list and it keeps shrinking so that's good.
A couple other minor problems, my Hag-Fiance' gets all goofy about sawdust and so I had to set my cut table outside on the deck. The bigger problem is that it has been raining damn near every single day so I have to dodge rain drops to get all this trim painted and cut.
This picture shows how the old baseboards, although removed, it shows how they were 'buried' when the hardwood floor was installed.
So I put those little blocks in the gap so the new taller baseboards sit on top of the floor.
View attachment 42756
And Petey, thanks for all the slick tips and advice and encouragement!
View attachment 42757
It all gets done if you keep grinding on it. Its not going anywhere, so just keep chipping away.
- Joined
- Aug 18, 2020
- Posts
- 11,615
- Reaction score
- 15,477
- Bookie:
- $ 5,797.00
Looks good now, leave it alone. Throw some plastic baseboard down and move the furniture in.Scuff that existing stone up a bit, so you get a good bond with the new stuff!
It all gets done if you keep grinding on it. Its not going anywhere, so just keep chipping away.
- Joined
- Aug 17, 2020
- Posts
- 20,602
- Reaction score
- 46,628
- Bookie:
- $ 83,441.00
The stone aorund the fireplace doesnt fit his scheme. Mind your lazy business, Mr. Cutcorners McGillicutty.Looks good now, leave it alone. Throw some plastic baseboard down and move the furniture in.
- Joined
- Aug 18, 2020
- Posts
- 11,615
- Reaction score
- 15,477
- Bookie:
- $ 5,797.00
The BatCave Scheme?The stone aorund the fireplace doesnt fit his scheme. Mind your lazy business, Mr. Cutcorners McGillicutty.
Or the BearCave scheme?
Question….do the chocks you put down to elevate the baseboards go under the wall with expansion/contraction or does the wall come all the way to the floor and not allow that?It looks like a Wednesday start for that task! Maybe even later in the day tomorrow if I can wrap up this baseboard.
Finish work takes me forever though, I have a punch list and it keeps shrinking so that's good.
A couple other minor problems, my Hag-Fiance' gets all goofy about sawdust and so I had to set my cut table outside on the deck. The bigger problem is that it has been raining damn near every single day so I have to dodge rain drops to get all this trim painted and cut.
This picture shows how the old baseboards, although removed, it shows how they were 'buried' when the hardwood floor was installed.
So I put those little blocks in the gap so the new taller baseboards sit on top of the floor.
View attachment 42756
And Petey, thanks for all the slick tips and advice and encouragement!
View attachment 42757
I know the one time I did laminate it was laid out strongly to me that I need to allow the floor to be able to expand and contract in different temps and humidities.
- Joined
- Aug 17, 2020
- Posts
- 20,602
- Reaction score
- 46,628
- Bookie:
- $ 83,441.00
YesThe BatCave Scheme?
Or the BearCave scheme?
- Joined
- Aug 18, 2020
- Posts
- 11,615
- Reaction score
- 15,477
- Bookie:
- $ 5,797.00
That's a real wood floor, I'm pretty sure it gets edge nailed anyway.Question….do the chocks you put down to elevate the baseboards go under the wall with expansion/contraction or does the wall come all the way to the floor and not allow that?
I know the one time I did laminate it was laid out strongly to me that I need to allow the floor to be able to expand and contract in different temps and humidities.
Yep. That was the clear as day detail I was missing.That's a real wood floor, I'm pretty sure it gets edge nailed anyway.

- Joined
- Aug 18, 2020
- Posts
- 11,615
- Reaction score
- 15,477
- Bookie:
- $ 5,797.00
Bear claws would tear the hell out of laminate, no way it would hold up.Yep. That was the clear as day detail I was missing.
- Joined
- Dec 1, 2020
- Posts
- 2,528
- Reaction score
- 3,795
- Bookie:
- $ 3,000.00
- Location
- Gwinnett County, Ga.
Question….do the chocks you put down to elevate the baseboards go under the wall with expansion/contraction or does the wall come all the way to the floor and not allow that?
I know the one time I did laminate it was laid out strongly to me that I need to allow the floor to be able to expand and contract in different temps and humidities.
Good to see you again, OE! It rained non stop ALL day yesterday so not a thing got cut or painted but I still scratched and picked at other smaller details.Yep. That was the clear as day detail I was missing.
- Joined
- Dec 1, 2020
- Posts
- 2,528
- Reaction score
- 3,795
- Bookie:
- $ 3,000.00
- Location
- Gwinnett County, Ga.
I have all the baseboards installed in the kitchen, the living room and foyer and today will be an early finish (i hope) putting in the rest of the quarter round. This is really a pain in the neck job to do from a wheelchair, that's why it's taking so long. My next task is to cut that stone tile for the fireplace, how very exciting! I'm not kidding around!Scuff that existing stone up a bit, so you get a good bond with the new stuff!
It all gets done if you keep grinding on it. Its not going anywhere, so just keep chipping away.
I also sprinkled this diatomaceous earth in all the gaps between the wall and floor before the baseboards were installed. This stuff kills roaches like nobodies business. We been using it in the basement for a few years now and whenever I see a roach down there it is either dead or dying. Somehow this powder destroys these bastards, I think it's a mechanical process where this powder tears their shit up. But it's not toxic to people.


Peace & Love, Kind Friends!
- Joined
- Dec 1, 2020
- Posts
- 2,528
- Reaction score
- 3,795
- Bookie:
- $ 3,000.00
- Location
- Gwinnett County, Ga.
It wasn't such a short day yesterday after all, I got finished about 4pm eastern and then after dinner I filled all the nail holes and all and any gaps in the corners, I filled 'em with wood filler. I make my own wood filler too. I use sawdust from one of my sanders and mix it with wood glue and I also mix paint (any color) into it too in small batches for a custom experience! When things get ugly, I just lean on my Dunce Crafting skills for a beautiful finish!
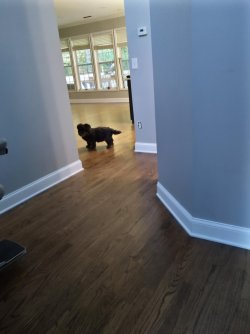
Today I will get that TV mount installed and after that I will try my hand at cutting tile, a task that is new to me.

Today I will get that TV mount installed and after that I will try my hand at cutting tile, a task that is new to me.
- Joined
- Aug 17, 2020
- Posts
- 20,602
- Reaction score
- 46,628
- Bookie:
- $ 83,441.00
- Joined
- Dec 1, 2020
- Posts
- 2,528
- Reaction score
- 3,795
- Bookie:
- $ 3,000.00
- Location
- Gwinnett County, Ga.
Here's my situation Petey. I have three full tiles (12"x12") and a partial and I will need three more tiles to complete the job. Before my roommate left for the weekend she asked me not to start until she is here. I think she lacks confidence in me for this task but I'm not lacking in confidence because you en-COURAGE-d me, of course I can cut straight lines!Get that stone around the fireplace already!!!!!
So instead I kep painting stuff, I still have one more door to paint black after this one.
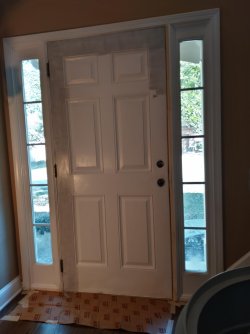
The front door was white and I just started prime painting it.
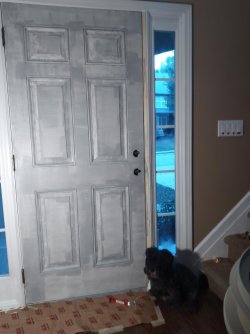
This is after one coat of primer and with such an uneven finish, a second coat of primer makes a big difference in the final finish.
Bailey just HAS to STAY in my way all day long! He has the whole house to loaf around in and he insists on keeping an eye on me! I like it though, he is the coolest pooch on the entire Planet Earth!
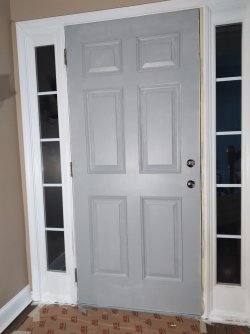
I will get a couple top coats on today.

