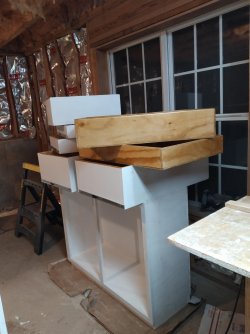
Twelve Kitchen Cabinets

There's something else I wanted to mention about this project to those that are interested. I'm a cripple. And I only have one good hand, my left hand and I was naturally right handed. I'm doing this work from a wheelchair and walker and I am KICKIN ITS ASS!!!
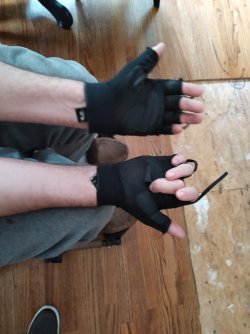
handy.jpg

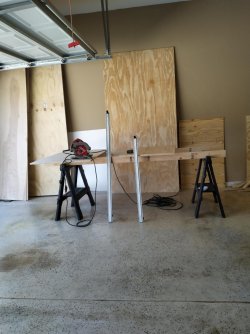
And guess what? I can handle a full sheet of 3/4" plywood by myself. When I bought the plywood in October I had 16 pieces stacked upright against the wall. I'm able to tip a sheet over so it's now lengthwise along the wall and then I put two small bar clamps about 30" apart centered on the sheet. Then I push my horse table about 2 feet away from the piece of plywood and lean the sheet against my horse table and I'm able to yank the full sheet up onto the horse table and then it's time to measure and cut! I am enjoying this project like nobodies business!
plywood in garage.jpg
 
There's something else I wanted to mention about this project to those that are interested. I'm a cripple. And I only have one good hand, my left hand and I was naturally right handed. I'm doing this work from a wheelchair and walker and I am KICKIN ITS ASS!!!
View attachment 22940

And guess what? I can handle a full sheet of 3/4" plywood by myself. When I bought the plywood in October I had 16 pieces stacked upright against the wall. I'm able to tip a sheet over so it's now lengthwise along the wall and then I put two small bar clamps about 30" apart centered on the sheet. Then I push my horse table about 2 feet away from the piece of plywood and lean the sheet against my horse table and I'm able to yank the full sheet up onto the horse table and then it's time to measure and cut! I am enjoying this project like nobodies business!
View attachment 22942
Are you shitting me? One decent off hand, and a wheel chair?!?!


Own It Cbs GIF by Paramount+
 
There's something else I wanted to mention about this project to those that are interested. I'm a cripple. And I only have one good hand, my left hand and I was naturally right handed. I'm doing this work from a wheelchair and walker and I am KICKIN ITS ASS!!!
View attachment 22940

And guess what? I can handle a full sheet of 3/4" plywood by myself. When I bought the plywood in October I had 16 pieces stacked upright against the wall. I'm able to tip a sheet over so it's now lengthwise along the wall and then I put two small bar clamps about 30" apart centered on the sheet. Then I push my horse table about 2 feet away from the piece of plywood and lean the sheet against my horse table and I'm able to yank the full sheet up onto the horse table and then it's time to measure and cut! I am enjoying this project like nobodies business!
View attachment 22942
Holy shit...what? Brag away on that one, brother. I was inspired by the work before I knew this.

I had to work out a ridiculous grouping of things in the garage just to get my 3/4 MDF up onto the horse the other week by myself. And I stand and have both hands.

Keep sharing, I’m enjoying this project a lot. Even more so now understanding youre doing it yourself with these limitations. And the tip of the turnbuckle was awesome. My cabinet for my workbench was only about 1/16 to 1/8 off square and I’ve been able to get the drawers built into it. But I would have really liked to get it dead on square. That tip will help!
 
That's funny about pendejo! And I certainly appreciate the sincere compliment, thanks, Slinky!
You remind me of a certain poster from Akron, Ohio.
 
Okay friends just a quick update on my project. The demo work that I planned to start this week has got delayed again for a couple reasons. One, the floor people aren't even close to starting and two, my hag/lover canceled her short trip she had planned. Silver lining though, I will be able to add another month of savings to pay for the countertops. And I still have a solid three weeks of work left to have all 15 cabinets totally completely finished so it's not like I would be sitting on my thumbs waiting with nothing to do.

I also wanted to thank everybody that's been following my progress, in particular @Peter Gozintite and @Orlando_Eagles for their supportive words and especially their kindness. I really appreciate it and it means a lot to me!
I can only imagine how many times you had to handle a sheet of plywood, in a wheelchair, to figure out how to grab and move them, or load them on your cut station, or position yourself to make cuts with a saw, and router. There must be a ton of trial and error when doing shit like this with limitations. Keep grinding
 
I can only imagine how many times you had to handle a sheet of plywood, in a wheelchair, to figure out how to grab and move them, or load them on your cut station, or position yourself to make cuts with a saw, and router. There must be a ton of trial and error when doing shit like this with limitations. Keep grinding
I know you said walker too, but it has to be difficult. I have no excuses to not do the shit I need to do.
 
There's something else I wanted to mention about this project to those that are interested. I'm a cripple. And I only have one good hand, my left hand and I was naturally right handed. I'm doing this work from a wheelchair and walker and I am KICKIN ITS ASS!!!
View attachment 22940

And guess what? I can handle a full sheet of 3/4" plywood by myself. When I bought the plywood in October I had 16 pieces stacked upright against the wall. I'm able to tip a sheet over so it's now lengthwise along the wall and then I put two small bar clamps about 30" apart centered on the sheet. Then I push my horse table about 2 feet away from the piece of plywood and lean the sheet against my horse table and I'm able to yank the full sheet up onto the horse table and then it's time to measure and cut! I am enjoying this project like nobodies business!
View attachment 22942

I love you man! You just don't know....

I'm in awe.
 
I can only imagine how many times you had to handle a sheet of plywood, in a wheelchair, to figure out how to grab and move them, or load them on your cut station, or position yourself to make cuts with a saw, and router. There must be a ton of trial and error when doing shit like this with limitations. Keep grinding
I was working on finishing up my workbench project Sunday and just thinking every step how would I handle this if I were more physically limited. It’s amazing to me. I constructed a maze of things of varying heights just to get a 3/4 sheet on the horses recently, and I still buggered up a corner from dropping it. I’m in awe of this.
 
Okay friends just a quick update on my project. The demo work that I planned to start this week has got delayed again for a couple reasons. One, the floor people aren't even close to starting and two, my hag/lover canceled her short trip she had planned. Silver lining though, I will be able to add another month of savings to pay for the countertops. And I still have a solid three weeks of work left to have all 15 cabinets totally completely finished so it's not like I would be sitting on my thumbs waiting with nothing to do.

I also wanted to thank everybody that's been following my progress, in particular @Peter Gozintite and @Orlando_Eagles for their supportive words and especially their kindness. I really appreciate it and it means a lot to me!
I know that feeling of being close to done and just wanting to push through. Slow and steady will still get it there. And you have the right idea on the additional savings to really bring this home.
 
Do you mean @Wamu ? Is @SlinkyRedfoot from Akron too? Guns, do you remember Sugar from the old Fannation? We went to jr. high and high school together.
Yes, I remember Sugar. She was fun to post with and just a wild and crazy gal.
 
Do you mean @Wamu ? Is @SlinkyRedfoot from Akron too? Guns, do you remember Sugar from the old Fannation? We went to jr. high and high school together.

You went to Kenmore then? A few years ago the city tore down Garfield & Kenmore high schools. Guess a new H.S. will be built where Garfield was. And how you been?
 
I love you man! You just don't know....

I'm in awe.
Back at ya my southern brother! I've been working on this stuff every day since I started back up at the end of February and probably another week to ten days and these 15 cabinets should be completed. I have to take tomorrow off though, I have to go to the VA every six months so they can keep me alive and kickin! I'll post up some pics when the demo starts and also when I finish the cabinets.
 
Just a little snippet here, minor update, AKA look what I did! Well I have ten base cabinets built with a total of 22 drawers. Four base cabinets plus a dishwasher will be the island and the other six will line one wall divided by a doorway to the dining room. I have a 5 sec. video here that shows how the drawer hardware works. It's really slick because each slide has a small hydraulic unit that self closes the drawers after a good push. Yesterday at the Atlanta VA I showed off my pics to my doctors and they were impressed and I might get interviewed to be highlighted in a monthly magazine that Veterans Admin sponsors! For me that would be quite an honor, like getting a troby!:first:
 
It's me again, the Guide Bear and I wanted to talk about drawer hardware and how I make a drawer. Let's start with the hardware. A drawer can slide on simple and inexpensive wood rails but the drawer slides made out of steel with three telescoping sections and ball bearings are a major improvement over wood rails. Add the hydraulic self closing feature and it becomes a pretty slick slide.

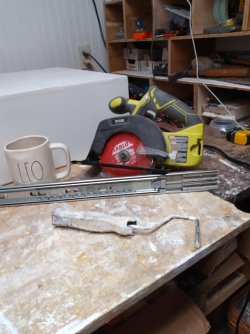
This is what it looks like.
drawer slide self close.jpg

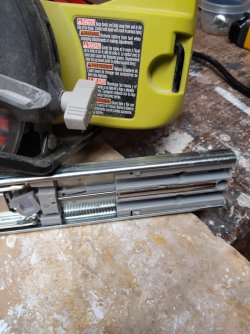
And these are the working parts...
drawer slide mechanism self close.jpg


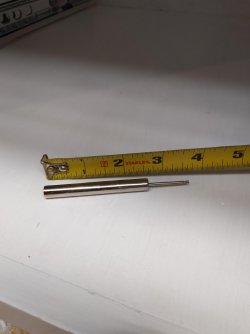
And this is the actual hydraulic piston removed from the slide. I like to take things apart!
drawer slide self close hydraulic piston.jpg


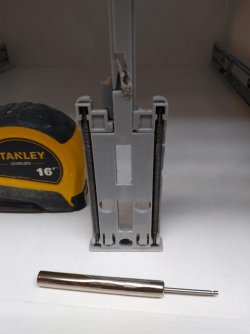
The way these work and the drawer is pushed in to a certain point, it engages and those two springs do the real work, those springs are much stronger than they look. So it's the springs that pull the drawer shut and the hydraulic piston gives resistance to the springs creating a nice soft and slow closing of the drawer.
drawer slide springs and piston.jpg
 
As for making a drawer, it's a simple procedure. Old school wisdom says that a floating bottom is necessary so that the changes in humidity don't cause the drawer to stick. A floating bottom is one that is raised up about 1/4 to 1/2 inch and slid into grooves (dados) cut in the side pieces. There's two main reasons that I think floating bottoms are no longer needed.
1. With today's high quality paints and polyurethanes every surface can be sealed negating much of the effect of swelling caused by humidity.
2. Most houses today are climate controlled all year long keeping humidity levels nearly constant again negating the effect of swelling and shrinking caused by changes in humidity.

more drawers.jpg

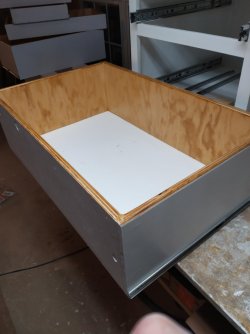
So I use a fairly simple rabbet joint for the sides and then even more simple, I fasten 3/8" plywood for the bottom directly on the bottom of the side pieces. For the side pieces I use the same 3/4" plywood that I use for the cabinets. I round the edges over with a trim router, poly the inside, natural wood color and I paint the outside white. On each and every drawer I installed a permanent white plastic liner using contact cement. It wipes clean so nice and it's much better than a painted surface. Drawer bottoms take a beating, things get spilled, they get scuffed up and these liners solve all those problems.


a drawer.jpg


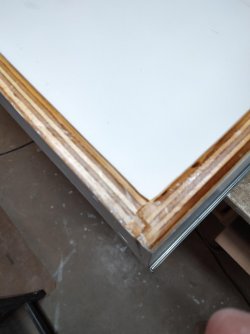
This is a close up of the rabbet joint I use. It's a lot better than a butt joint because the surface area of the joint is doubled compared to a butt joint. I use wood glue and a 16 gauge nail gun to hold it all together. And just like my cabinets these drawer boxes are rock friggin solid!
rabbet joint.jpg

Well that's all for now, peace and love, my friends!
 
It's me again, the Guide Bear and I wanted to talk about drawer hardware and how I make a drawer. Let's start with the hardware. A drawer can slide on simple and inexpensive wood rails but the drawer slides made out of steel with three telescoping sections and ball bearings are a major improvement over wood rails. Add the hydraulic self closing feature and it becomes a pretty slick slide.

This is what it looks like.
View attachment 24335

And these are the working parts...
View attachment 24338


And this is the actual hydraulic piston removed from the slide. I like to take things apart!
View attachment 24339


The way these work and the drawer is pushed in to a certain point, it engages and those two springs do the real work, those springs are much stronger than they look. So it's the springs that pull the drawer shut and the hydraulic piston gives resistance to the springs creating a nice soft and slow closing of the drawer.
View attachment 24340
I would say at least 1/3 of my workbench cabinet budget was the drawer slides. Due to the odd dimensions they had to be 26”. I bought exactly the same kind, except they don’t have the slow close, hydraulic bit. They really make the whole thing work well, especially since drawers as 22”x26” and have some weight in them now.

Not going to quote a second post on the drawer info you shared, but that was awesome! I did floating drawer bottoms....just because that’s where my mind went. I think it will be good as I didn’t finish the wood at all, and it’s a garage in Florida. It’s about to experience immense humidity. Hmmm....maybe I should go back and give everything a coating.

I wish I had thought to do rabbit joints. I just did butted joints with glue and a few tap nails. I’m sure these drawers are going to start coming apart on me....
 
Top